Mobile Cloud Application
This assignment has been archived and no longer in-use. It is kept for reference purposes.
General Overview
In recent years, mobile cloud computing has been one of the hottest topics regarding technological advancement. So what exactly is mobile cloud computing, and why has it gotten so much attention?
Smartphones and tablets have become ubiquitous. Owing to these technologies, people have found new ways to spend their time more fruitfully by doing more with their mobile devices. Mobile cloud computing is a crossover between mobile web and cloud, offering greater possibilities in terms of power and productivity.
The mobile web refers to browser-based web applications for mobile devices. Compared to native ones, these applications used to be handicapped by the lack of features such as offline storage and support for hardware such as cameras. To address this situation, W3C has standards that browsers can implement, giving developers a consistent API to access features that would otherwise require writing a native application. The gap between mobile web and native applications is thus narrowing.
Cloud computing is where data and processing power are accessed from a pool of shared online resources known as the cloud. You can visualise it as a supercomputer containing all the applications and data belonging to its users. A user can run their applications and process the data in the cloud using any connected device as a remote controller.
Combining their characteristics results in mobile cloud applications with the following strengths:
-
Availability - With all data and configurations stored in the cloud, the user will be able to enjoy the same experience any time and anywhere using any mobile device.
-
Productivity - What we previously could do only at home or in the office can now be done on the go. We are now able to read emails the moment they are received, edit documents or even catch up with friends over Facebook and WhatsApp during a commute.
-
Device-independent - Want to replace your iPhone with the latest Android? A web application runs in any modern browser, so there is no need to worry if your favourite application has yet to be ported to other platforms.
-
Low hardware requirements - All heavy computations are offloaded from the client to the servers, reducing the application's role to an interface for sending commands to the cloud. In addition, parts of the data backed up in the cloud can be served on demand. The mobile device, therefore, does not need to have large processing power and storage capacity.
Grading and Admin
This assignment can be done in groups of three or four students. If you are unable to find yourself a group, you will be randomly assigned one.
This assignment is highly open-ended. We provide milestones so that we can grade your application in a consistent way, even though everyone will be building different apps. This assignment is also designed to introduce you to the various elements of mobile cloud application development, and the milestones are there to ensure that you learn about the elements in a structured way. We will also provide some related tips, references and a little bit of help to get you started. These milestones constitute 70% of the assignment's grade.
With that said, you have a lot of freedom to express your creativity. You are free to develop any application you choose. However, if some of the proposed milestones do not make sense for the application you intend to build, you can petition to replace them with some other deliverables. You are to explain why we should agree to your petition and submit your petition at least one week before the assignment is due. Your petition is subject to approval.
While the milestones may be easy to meet, simply meeting them will not give you full credit. We ask for quality submissions, not run-of-the-mill work.
To score the coveted remaining 30%, use your creativity to develop an application that stands out from the rest. We will not limit your potential by restricting the kind of application you can build. We expect that you (pleasantly!) surprise us with what you are capable of doing. Do note that features must fit the aim of your application; ideally, they should be seamlessly integrated.
For example, WebVR and geolocation might be the latest and coolest feature supported by most mobile browsers, but they may not contribute to the user experience in a document editor. In fact, implementing features for the sake of doing so may work against you (and your grades) by confusing the user.
Please do not hesitate to approach the friendly CS3216 staff if you need further assistance. We can be contacted at cs3216-staff@googlegroups.com.
Objectives
The high-level goal of this assignment is simple: a working Progressive Web Application that utilises the capabilities of a mobile device and is able to persist the users' data in the cloud. Your task is to demonstrate that you can design and implement RESTful APIs, as well as build a Progressive Web Application that consumes your API. You can use any backend language and/or framework you desire.
Remember, your goal is not to do a lot of work. Your goal is to use this opportunity to make a difference. If you can make a difference by just doing very little work, that is fine with us.
Before you begin, please read through the whole assignment once to get a sense of what is required. The grading scheme can be found at the end of this handout.
Please read the entire assignment before thinking about what you want to develop. It may give you a clearer idea of how all the parts come together and also a better understanding of the strengths and weaknesses of a mobile cloud application.
Phase 0: Introduction
The reward for doing good work is more work.
– Ben Leong
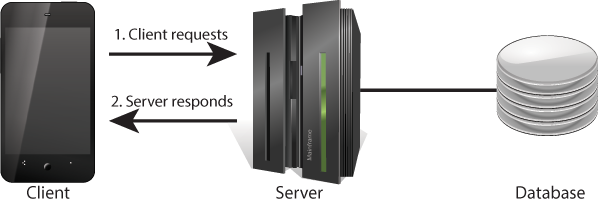
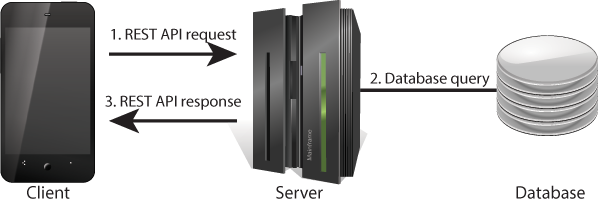
This assignment comprises 4 weeks of intensive learning that provides you with another opportunity to express your creativity. We will be focusing on mobile cloud applications, typically with the following components:
-
Clients - Clients reside on mobile devices belonging to users. They could be (1) native applications, which run only on their intended platforms or (2) HTML5 web applications with the potential to work on any device with an HTML5-enabled browser. The client application provides the user with an interface to view and manipulate data. For this assignment, you will be building a web app, not a native app.
-
Server - The server runs on the cloud and serves data to the client. For example, transactions on an e-commerce app are requested by the client and processed on the server. Often, heavier computations such as video transcoding are also handled by the server because the computational power of mobile web browsers is limited.
-
Database - The database does exactly what we would expect of it in any other context, which is to store all of the application's data.
Depending on the size of the service, differing amounts of hardware may be deployed to keep up with the demands of its users. Obviously, large services will require more than a single server and database. There are many ways to configure multiple servers and databases to work together so that the service scales. You may read more about distributed systems in this article (opens in a new tab). Several server instances can be run simultaneously while using load balancers to split the work evenly among them. Data can also be replicated over several databases and/or sharded based on predefined hash functions for higher reliability and availability. Such are issues to consider as you extend your reach to more users, but we shall start small for this assignment. In its simplest form, a mobile cloud application can be hosted with the server and database sharing an AWS instance.
One of the benefits of having a client-server architecture is that different kinds of clients (Web, iOS, Android, Mac, etc.) can reuse the API exposed by the same server. You will not need to rewrite your server if you need to cater to a new client.
On a native iOS/Android app, users will normally download the clients from the online application stores for their respective platforms. In our case, the workflow differs a little from native applications. Since our client is created with HTML5 and supporting web technologies such as JavaScript and CSS3, it is essentially a web page. During the user's first visit to the site, we will tell the browser to quietly download and save the program for future use. A Service Worker will help retain resources through the Cache API, which could then be used to serve the "web page" in the absence of an Internet connection.
When this happens, the client can operate with limited functionality when offline and communicate with the server using AJAX calls while it has Internet access. Requests typically take the form of JSON-formatted messages, and they contain details of a job to be processed by the server, such as querying the database for some information or updating its records. The server then replies with a similarly formatted message response, which the client is responsible for decoding and displaying to the user.
Phase 1: Design
Idea Generation
The best way to predict the future is to create it.
– Abraham Lincoln
As an aspiring entrepreneur of CS3216, you have a mind full of big ideas eagerly waiting to see the light of day. After a long discussion with the team about the unlimited potential of your new product, you are now more sure than ever that this is going to be the next big thing. You expect more users than Facebook, Twitter and Pokemon Go combined, and to keep this many people waiting for any longer is simply evil.
Before you jump into developing the specifications of your application, a very important question to ask yourself is, "Does my application solve any problem for the users?". An application that has many superfluous features does not make it useful. Just because your application has a cool concept or uses the latest technology does not guarantee that the initial users who joined out of curiosity will stay on. On the contrary, if a less fancy but more practical solution makes the user's life easier, it is more likely that the user will be retained. Solve a problem that people care about, solve it well, and fans of your application will naturally accumulate. Your users become the fans that will help you spread the message about your application via word-of-mouth.
Milestone 0: Describe the problem that your application solves. (Not graded)
Building a killer application requires more than just technical skills. In CS3216, we expect you to think very hard about what you're trying to do. You should not be building an application just because you need to submit this assignment.
You should choose an application that fully utilises the potential of the platform. In CS3216 (and life in general), execution matters. Choosing the most suitable platform for your application is part of the execution. Thus, we expect you to come up with a good reason as to why developing a mobile cloud application would best achieve your application's objectives.
Milestone 1: Describe your application and explain how you intend to exploit the characteristics of mobile cloud computing to achieve your application's objectives, i.e. why does it make the most sense to implement your application as a mobile cloud application?
It is no good to have a killer app that nobody uses. Hence, you will need to think a little harder about how you plan to "market" your app to potential users. You must identify your target users, determine the relevance of your application to them (i.e. why they should care about your application) and explain how you plan to reach out and persuade them to use your application.
In order to promote the use of your application, good marketing strategies are crucial in raising awareness of your application among targeted users. After introducing potential users to your application, how would you try to persuade them to continue using the application, and perhaps, even share or introduce it to others? What value do the users derive from using your application?
Ideally, you should also think of ways to provide motivation for users to share your application with their friends. The application should be designed such that while individual users may derive some value using your application, it is in their interest to promote your application (e.g. a reward scheme can be set up to give out benefits for referrals).
The number of users with mobile devices has grown rapidly in recent years. Given this trend, how would you take advantage of this growth to increase the number of people using your application?
Milestone 2: Describe your target users. Explain how you plan to promote your application to attract your target users.
Now that you have a solid idea of what you want to build, it is a good time to pick a suitable name for your mobile cloud application if you haven't already done so.
An Overview of Relational Databases
A relational database is a type of database that models stored data as tables with columns and rows. It is called "relational" because you can link a table to another table through foreign keys.
In this section, we will be going through simple relational database concepts. There are some other more advanced concepts that you can read up online.
A database application may store several databases. Hence, while each application will usually use its own database, several applications may share the same database application running on the same server (e.g. if you and a friend each have a blog, even if each blog needs 1 database, you could still house both blogs on the same MySQL instance).
To visualize a database at the highest level, we can think about its schema, which is basically a blueprint of the database's tables, their structural details, and the relationships between them.
Schemas define two things: tables and relations. Tables contain one or more columns each. For example, we can imagine a students table containing 5 columns: matric_no, name, address, phone, birthdate. Each column has a type that you need to specify (e.g. name is of type TEXT, birthdate is of type DATE). Actual data will then be simply stored as rows in the table.
Each row needs to be uniquely identifiable. If two rows happen to be completely identical, you will run into trouble trying to update or delete them since there is no way to pinpoint exactly which one you mean. Thus, we usually have a column (or a set of columns in combination) that we require to be unique for each row. We call this the primary key. In the students table example, the matric_no column is an excellent candidate for the primary key since no two students share the same matric number. MySQL (and any other proper database system) will prevent you from inserting a row if there already exists another row with an identical primary key.
Relations indicate relationships between tables. For example, suppose we add a home_faculties table containing two columns: matric_no and faculty – a simple mapping of student to faculty. We can link this table to the previous students table using the matric_no column, which both tables share. We say that matric_no in the home_faculties table is a foreign key that references the matric_no column in the students table. Note that a foreign key column set must reference a primary key column set of another table. Note also that our two-table set-up allows students to become members of two faculties (e.g. when doing double degrees). It would not be possible to fully go through all the details about relational database concepts here. For a better or further understanding, you might want to look up additional readings about the topic online.
What is the primary key of the home_faculties table? (Not graded)
Other important concepts include indexed columns (allowing searches to be fast), unique keys (enforcing uniqueness for non-primary key columns), and relation cascades (where deleting a student from the students table can automatically update/delete all entries in other tables that reference this table). It's up to you to learn about all these on your own.
After this section, you should be ready to produce a schema for your application. Do consider how efficient your schema will be; specifically, think about the number of queries required to accomplish common tasks and the number of tables accessed to complete a single user query. Your schema should be graphical and should indicate clearly the table names, column names/types, primary keys, and relationships.
As a rule of thumb, you should remember that database schemas should be designed with a design once use forever principle in mind. You should spend a good amount of thinking on a good schema design, after which you should not need to come back and make drastic changes to it. Make sure you take some time to plan a good schema design. Having to perform a large schema migration when you realise your original schema wasn't flexible enough to support some feature can be a painful process, especially so if you already have a considerably large user base.
Milestone 3: Draw an Entity-Relationship diagram for your database schema.
If you are using MySQL Workbench, there is a feature to automatically create an EER diagram from your existing database schema (opens in a new tab). You may simply export this as a PNG file and include this in your milestone submission.
RESTful API
Much as we would love to immediately begin building the application, there is still one final thing we need to draw up plans for - the RESTful API itself. Being the bridge between the client and the server, both sides should be very clear of the specifications to avoid unnecessary confusion during development. If you only decide on parts of the interface while you program the application, you risk having an inconsistent API. It pays off to plan this well; who knows, your application may become so prominent that you might want to open the API to third-party developers.
Representational State Transfer, or REST in short, is an architecture for networked applications. Being one of the simplest architectures to deploy, it is a popular choice for many web services. REST is a client-server architecture where a client initiates a request to the server to be processed and receives a response with updated data. It is stateless, meaning that the server does not maintain the state of the client, and every message to the server must contain all necessary information to process the request. Not having persistent connections or complex states means that the service can be set up using simple web servers, and requests can be distributed across multiple servers for greater scalability.
Requests and responses can take many forms: JSON is the most common format. Note that the request and response may not necessarily be in the same format. For example, when uploading a photo to a site, usually, a request with type multipart/form-data is sent while the reply containing the photo ID is in JSON. We now take a quick detour to explore the JSON format since it is one of the easier ones to handle.
JavaScript Object Notation or JSON is a text-based data-interchange format. Consider your current scenario where you are working with an object in your client using JavaScript, and you need to send it over the network to be processed by the server. JSON is a set of rules to encode and decode data to and from a universally recognised string format so it can be used with any programming language which implements these rules. JSON works on any object made up of key/value pairs and/or ordered lists of values. The resultant string is also human-readable unless encoded binary files are involved. The following JSON string could be a response from a social network's REST API to a request for information on the user with id = 0, where { } represents a dictionary and [ ] an array.
{
  "id": "0",
  "name": "James",
  "tel": "61234567",
  "mobile": "87654321",
  "friends": [
    {
      "id": "1",
      "name": "Andy"
    },
    {
      "id": "2",
      "name": "John"
    }
  ]
}
JSON is already supported by all modern browsers and server-side scripting languages, so you do not need to implement it yourself, but if you want to know more, visit https://www.json.org/json-en.html (opens in a new tab).
Going back to the API, one way to start planning it is to write down a list of functionalities (which require server interaction) that you would like the client to have (e.g. send a private message, buy a product, leave a comment). Try to group related ones together (e.g. add/remove a friend), usually according to the resource/object.
Next, for every operation, you establish a triplet that describes it:
-
Request Method + Relative URL
When an address is entered into the navigation bar, the browser performs an HTTP
GETrequest to retrieve the page located at the URL. However, aPOSTrequest is made instead when we submit a registration form on the same page. If you haven't realised, in REST, the HTTP request method describes the action we want to perform, and the URL refers to the resource to act on. Just by looking at this combination, we should already fully understand the intention of the request.By convention, REST uses four request methods for the following purposes:
POST /products- Create new resource.GET /products/12345- Get existing resource corresponding to the id of 12345.PUT /products/12345- Replace existing resource corresponding to the id of 12345.PATCH /products/12345- Modify existing resource corresponding to the id of 12345.DELETE /products/12345- Remove existing resource corresponding to the id of 12345.
Notice how "clean" URLs are used instead of the query string version? Comparing
/products.php?id=12345to its clean form/products/12345, the latter is more readable and has greater semantic meaning. It also conceals implementation details of the server which is irrelevant to the client, such as the file extension of the server-side script.As limited as these request methods may seem, they are actually sufficient to describe any operation. Consider a request to make a purchase. Though there is no
buymethod, we do not append an action to the URL (POST /products/buy). Why make things more complicated when we already have a clean and built-in way of representing the operation? Instead, buying a product can be thought of as creating a 'transaction' (POST /transactions). The trick is to derive a noun from the action. -
Request Parameters
This is the data required to compute results. Typically, you only need this for
PUTandPOSTmethods. Any message format may be used here. You can consider using JSON for simpler requests andmultipart/form-datafor larger ones, like photos. -
Response Value(s)
This is the information to return to the client after processing the request. Like the parameters, you can choose to use any message format here. Make sure that you also plan for error responses using the semantically correct HTTP response code.
If your request can potentially return large amounts of data, consider using a pagination mechanism. Imagine the Facebook newsfeed API returning all entries since the day you joined the social network!
You may have the freedom of planning this however you like, but always try to keep your API consistent. It would also be pretty confusing if every API function uses different message formats.
There are too many REST practices to be discussed in detail here; make sure you do some research before you continue. You can find many articles and discussions online regarding RESTful API design. Note that this topic is highly opinionated, with many differing opinions on what constitutes REST. It is not necessary to go to great lengths to follow every single rule, but you must be able to justify your decisions with regard to your application's needs. If you have a ton of time (which you probably don't), you can read up on this lengthy but informative Microsoft REST API Guidelines (opens in a new tab).
Alternatives to REST
Besides REST, there have been various systems introduced more recently that support alternative ways for client-server communication. These systems have seen increased adoption by companies that benefit from the different approaches to exposing API.
Here are some popular alternatives to REST
- GraphQL (opens in a new tab)
- gRPC (opens in a new tab) (based on RPC architecture)
Milestone 4: Explore one alternative to REST API (may or may not be from the list above). Give a comparison of the chosen alternative against REST (pros and cons, the context of use, etc.).
Between REST and your chosen alternative, identify which might be more appropriate for the application you are building for this project. Explain your choice.
For your application, you may choose to implement a REST API or the alternative you have explored.
It is important to design the API contract between the client and the server well. With the API contract well-documented, the client can test out features relying on server data without the server implementing the API endpoint by sending mock API requests and receiving mock responses. Tools such as Apiary (opens in a new tab) and Faker (opens in a new tab) can help you with that. Apiary in particular, can help you document your APIs for both your client-side and server-side developers to reference. For GraphQL and gRPC, there are also tools to generate documentation from the schema and protobuf.
Complete the appropriate Milestone 5 below, depending on which system you have chosen.
EITHER
Milestone 5 (REST API): Design and document all your REST API. If you already use Apiary to collaborate within your team, you can simply submit an Apiary link. The documentation should describe the requests in terms of the triplet mentioned above. Do provide us with an explanation of the purpose of each request for reference. Also, explain how your API conforms to the REST principles and why you have chosen to ignore certain practices (if any). You will be penalised if your design violates principles for no good reason.
OR
Milestone 5 (alternative to REST): Provide equivalent documentation of your client-server communication. For GraphQL and gRPC, you can submit your schema or protobuf with additional descriptions or use any of the tools built on top of that. Also, explain how your design leverages the features of your chosen system. You will be penalised if your design fails to utilise any key features of the chosen system.
Phase 2: API Server
Don't worry about failure, you only have to be right once.
– Drew Houston
Now that you are done with the planning, it is time to turn your design into a usable product. Since the client is probably required to test much of the server's functionality (the reverse is also true), you are advised to split the work well among your teammates to develop the server and the client communication components concurrently.
To test out server-side APIs, a popular tool out there is Postman (opens in a new tab). Postman provides a user-friendly interface to construct your API requests to the servers; certainly easier than cURL-ing from the command line!
You will have to read up on how to implement REST endpoints on your back-end stack of choice. Here are links to starting guides for some common frameworks:
SQL: Querying the Database
Any decent web application should do more than returning a hard-coded array. Most of the time, you will have to query the database and construct the JSON response from the database result.
SQL is a standard language designed to manage a database and to retrieve or store data in a database. In addition to SQL, most database systems will have several additional SQL-like commands that are used to perform specific administrative tasks like adding new users or modifying passwords.
MySQL provides commands you can use to create and alter databases and tables, and also commands you can use to insert, update, delete, and retrieve rows from tables. We call the former "data definition language" (DDL) and the latter "data manipulation language" (DML). You should never run DDL commands from publicly accessible pages.
Most of the time, it is not a good idea to write raw SQL queries yourself. We recommend that you look up database connectors and ORM tools for the language/framework you intend to use.
Milestone 6: Share with us some queries (at least 3) in your application that require database access. Provide the actual SQL queries you use (if you are using an ORM (opens in a new tab), find out the underlying query and provide both the ORM query and the underlying SQL query). Explain what the query is supposed to be doing.
HTTP Request Methods
Now that we can obtain the results from the database queries, we can move on to providing the actual API for the client to use. We can do so by handling the common HTTP request methods used in REST services: GET, PATCH, PUT, POST and DELETE. As mentioned earlier, GET retrieves a resource, PATCH modifies it, PUT replaces it, POST creates a new resource, and DELETE removes the resource. If it is intended that users are not allowed a particular action, then you can ignore the corresponding request method.
Do remember to program defensively e.g. sanitise all input. Also, as different operations may be expecting differing types of data, you should always specify the content-type of the request and response message so that the receiving end knows how to handle it.
Phase 3: Mobile Client
Global vision, local win.
– Jack Ma
While an HTML5 application can be used by any device with a modern web browser, the immediate tradeoff is that our HTML5 application cannot directly access some of the native functionality and libraries on the device. In this section, you will learn how to create a simple Progressive Web App, that is, an HTML5 client that is able to work even while the device does not have an Internet connection.
Progressive Web Apps
In recent years, Google has been pushing the concept of Progressive Web Apps (opens in a new tab). Progressive Web Applications take advantage of new technologies to bring the best of mobile sites and native applications to users. They are:
- Progressive - Work for every user, regardless of browser choice, because they're built with progressive enhancement as a core tenet.
- Responsive - Fit any form factor: desktop, mobile, tablet, or whatever is next.
- Connectivity independent - Enhanced with service workers to work offline or on low quality networks.
- App-like - Feel like an app to the user with app-style interactions and navigation because they're built on the app shell model.
- Fresh - Always up-to-date, thanks to the service worker update process.
- Safe - Served via HTTPS to prevent snooping and ensure content hasn't been tampered with.
- Discoverable - Are identifiable as "applications" thanks to W3C manifests and service worker registration scope allowing search engines to find them.
- Re-engageable - Make re-engagement easy through features like push notifications.
- Installable - Allow users to "keep" apps they find most useful on their home screen without the hassle of an app store.
- Linkable - Easily share via URL and does not require complex installation.
It is recommended that you go through this short tutorial (opens in a new tab) on making your first Progressive Web App.
Next, we'll be exploring some of the features that constitute a progressive web app.
Add to Home Screen
Apart from your usual HTML5 features, most mobile devices allow users to add a shortcut to a web page to their home screen.
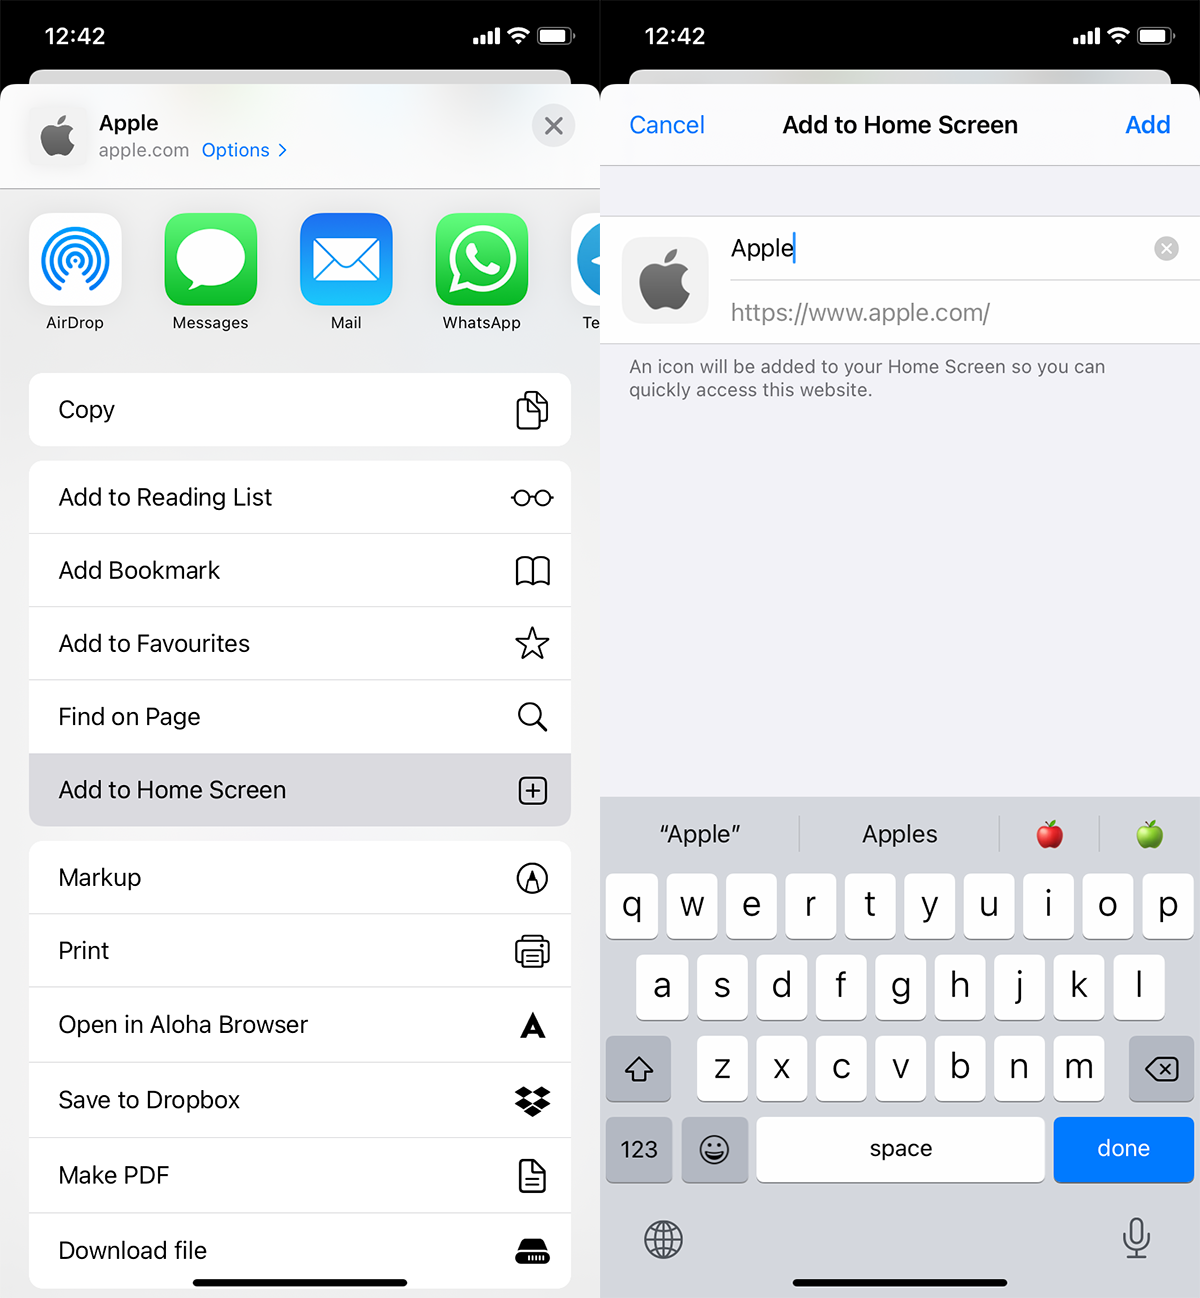
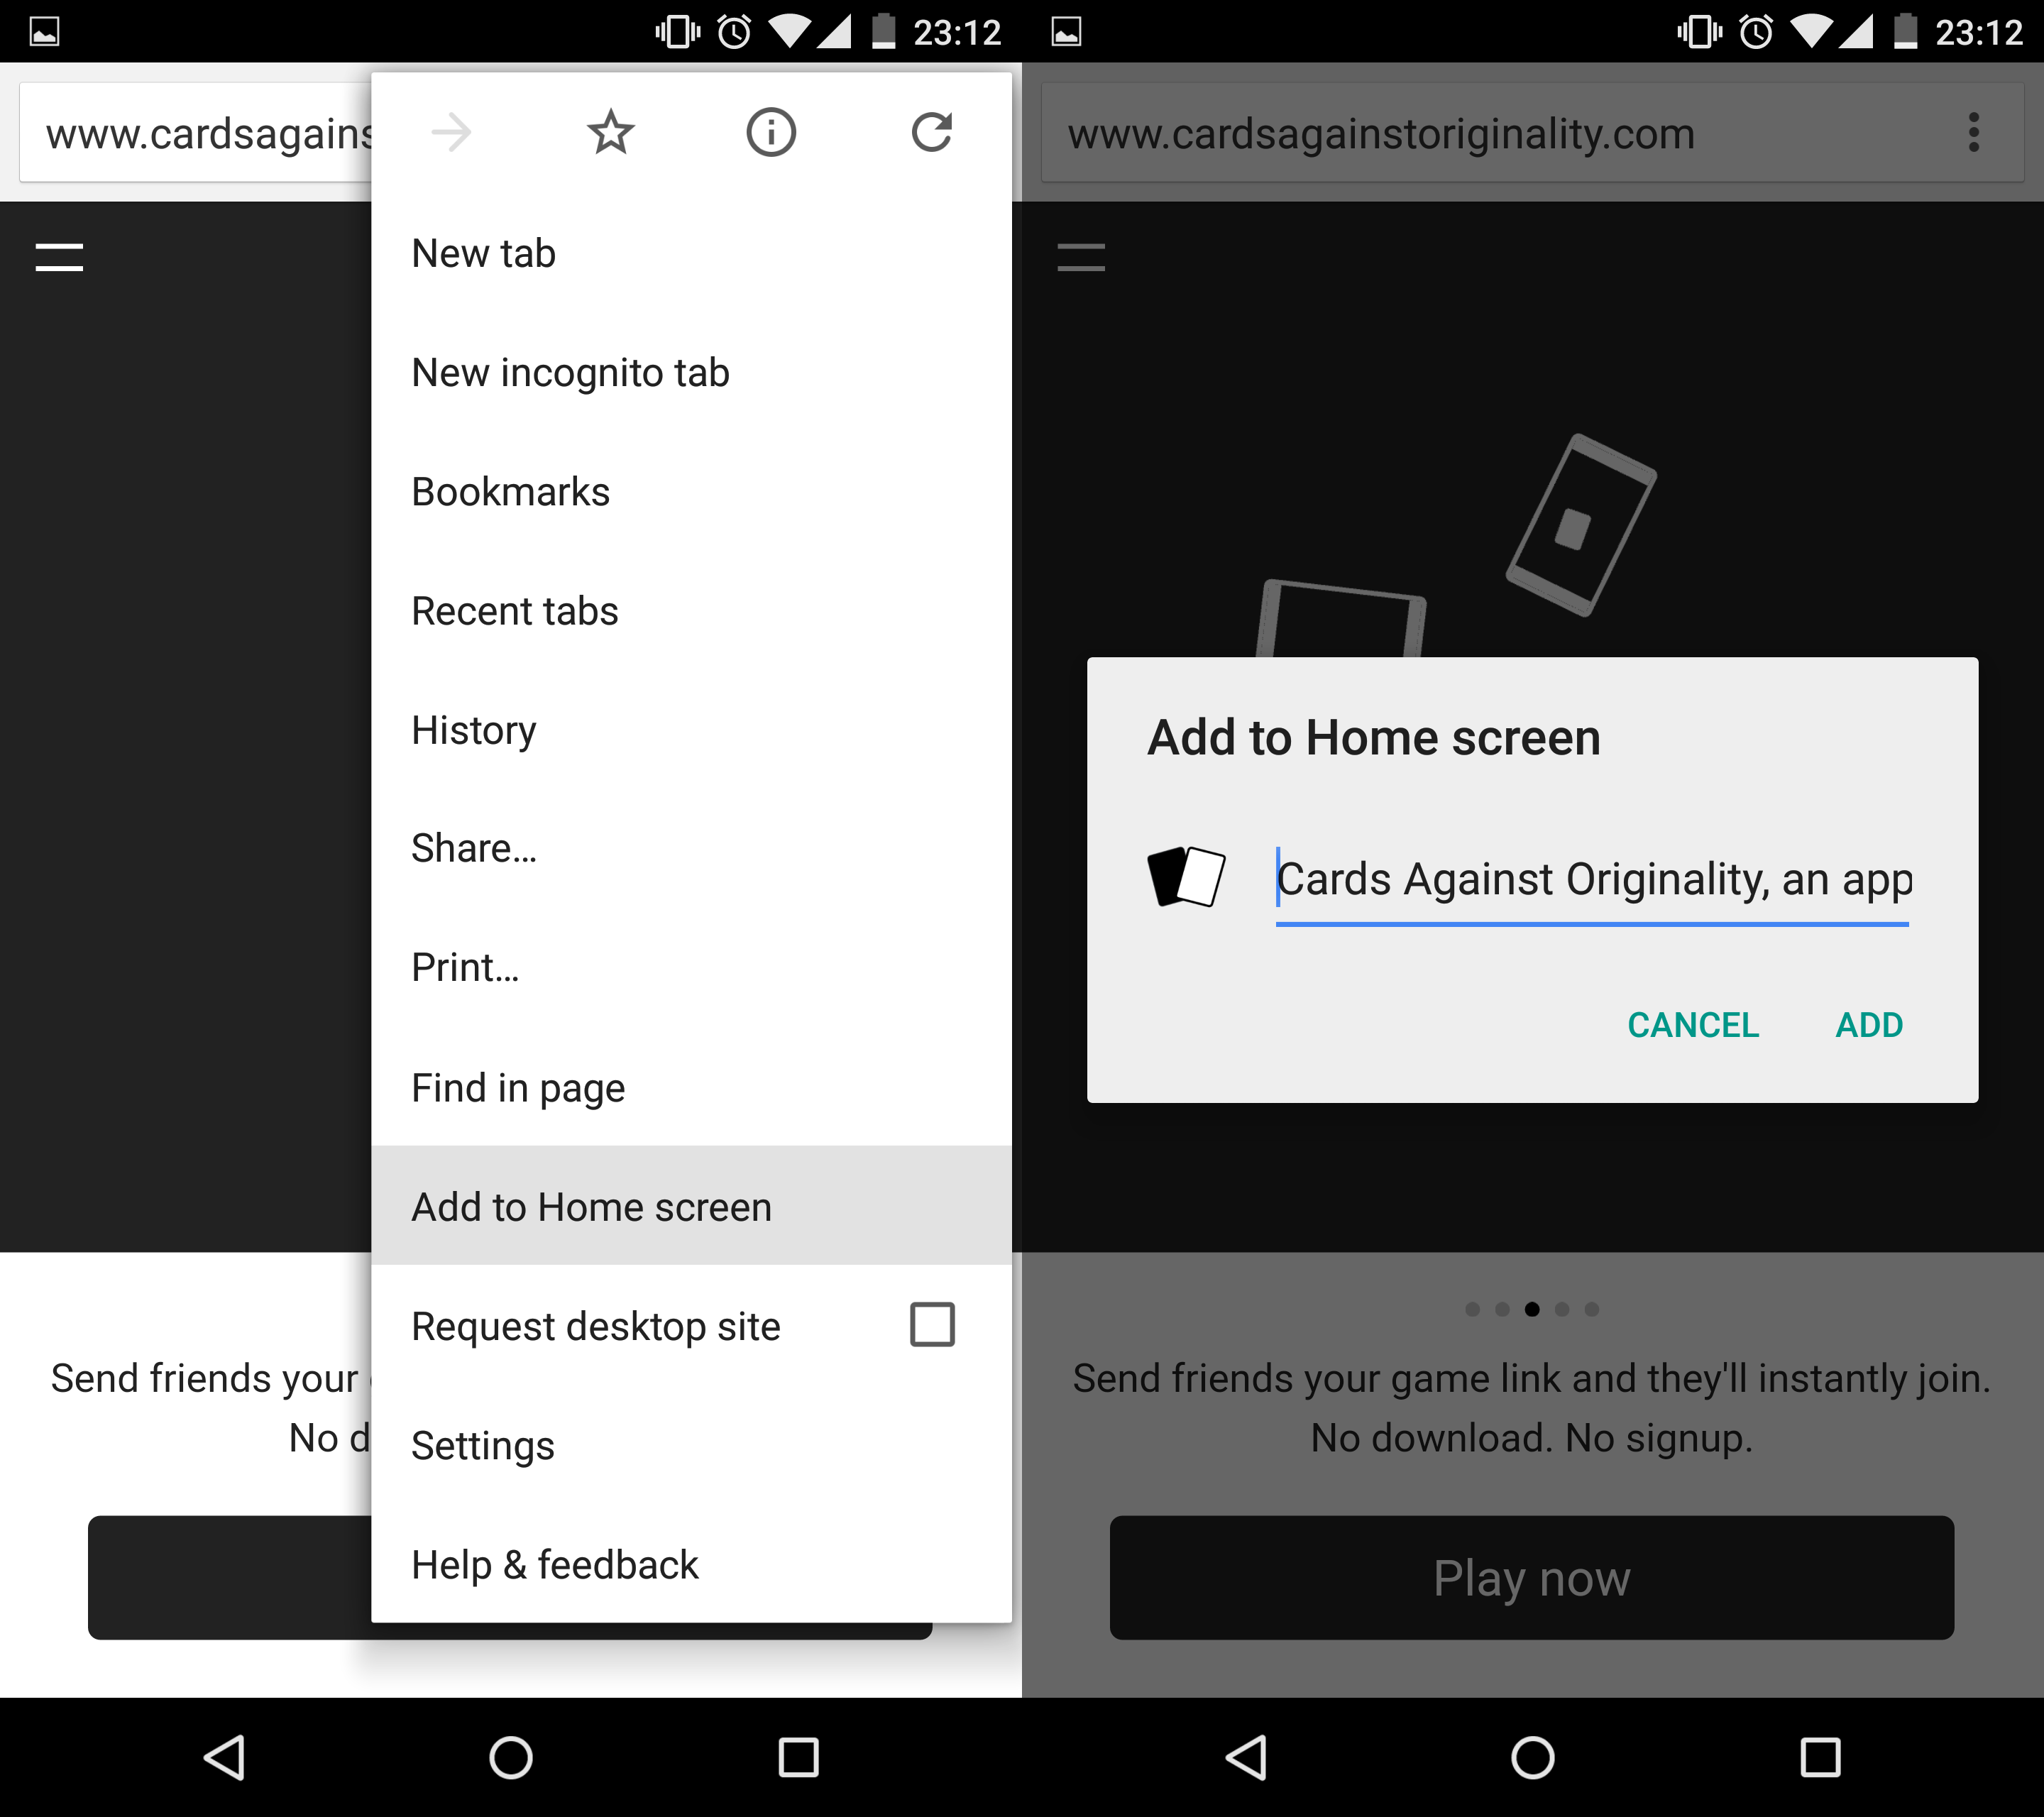
In iOS and Android devices, when these shortcuts are run, they are opened in a standalone browser window that does not include the default browser UI controls at the top and bottom. This allows web applications that have been added to the home screen to have more space to work with and look as if they were native applications. Special metadata tags have been developed to allow developers to set icons, splash screens and even the colour of the device's status bar. As much as users may like your application, adding a blank icon does not help users identify your application among the others they have installed. If users are willing to shortcut your application, capitalise on their goodwill by making it easy for them to return to your application.
You can find the documentation for doing that on Safari (opens in a new tab) and Chrome (opens in a new tab). If you plan to release your application, it is a good idea to do the same for other platforms that we may not have covered here.
Milestone 7: Create an attractive icon and splash screen for your application. Try adding your application to the home screen to make sure that they are working properly. Include an image of the icon and a screenshot of the splash screen in your write-up. If you did not implement a splash screen, justify your decision with a short paragraph. Add your application to the home screen to make sure that they are working properly. Make sure at least Safari on iOS and Chrome on Android are supported.
Presentation
Your team (or maybe just your user interface designer) should spend some time designing a good UI; a good UI helps keep users. Although the functionality of your application is important, the way it provides the functionality is just as important. Users will not continue using an application that is difficult to use, regardless of how technically superior your application is or what functionality it provides. If your users do not like it, they simply won't use it.
All you have to do is spend some time testing your application. In most cases, you will quickly know if your UI makes or breaks it. It's common sense!
After the UI has been designed, the UI needs to be implemented. Cascading Style Sheets (CSS) would be used since the application is actually just a fancy web page. All styles should be contained within CSS files, linked to the main page using <link> tags. It is generally a bad practice to mix CSS with HTML.
Good CSS is not easy to write, and many applications end up with messy CSS after an extended period of development as the application grows bigger. To solve this problem, front end developers have come up with methodologies to structure your CSS code:
- Object Oriented CSS (https://github.com/stubbornella/oocss/wiki (opens in a new tab))
- Scalable and Modular Architecture for CSS (https://smacss.com/ (opens in a new tab))
- Block Element Modified (http://getbem.com/ (opens in a new tab))
Read up on them and choose one (or more) to use in your code.
Milestone 8: Style different UI components within your application using CSS in a structured way (i.e. marks will be deducted if you submit messy code). Explain why your UI design is the best possible UI for your application. Choose one of the CSS methodologies (or others if you know of them) and implement it in your application. Justify your choice of methodology.
HTTPS
By default, your application should be accessible through the Hypertext Transfer Protocol (HTTP). However, that is considered a bad practice as HTTP data are transmitted through the network in plaintext, allowing anyone located between the web host and the client to be able to sniff and view any HTTP data, which may include passwords or tokens.
HTTPS (HTTP over SSL/HTTP Secure) is a protocol for secure communication over a computer network. HTTPS is not a separate protocol; it refers to the use of ordinary HTTP over an encrypted SSL/TLS connection. Almost everything in the HTTPS payload is encrypted, including the headers, request and response load.
If your application requests for personal identifiable information (PII) or credentials from the users, it is good practice to deploy HTTPS to protect your users against man-in-the-middle (MITM) attacks.
To prepare a web server to accept HTTPS connections, the administrator must create a public key certificate for the web server. This certificate must be signed by a trusted certificate authority for the web browser to accept it without warning. The authority certifies that the certificate holder is the operator of the web server that presents it. Web browsers are generally distributed with a list of signing certificates of major certificate authorities so that they can verify certificates signed by them.
SSL certificates are issued by certificate authorities (CA), whose certificates are by default installed into your machines, and obtaining them usually requires paying a bit of money (~8 USD to 70 USD per year). However, you can also obtain a certificate from Let's Encrypt (opens in a new tab) for free. Let's Encrypt launched in April 2016 and provides free and automated SSL/TLS certifications to websites. PWAs have to be served via HTTPS in order to make use of service workers. More on that later 😉.
Milestone 9: Set up HTTPS for your application, and also redirect users to the https:// version if the user tries to access your site via http://. HTTPS doesn't automatically make your end-to-end communication secure. List 3 best practices for adopting HTTPS for your application.
Offline Operability and Data Persistence
Very often, it is a good idea to provide the user with some level of offline operability. Even without an Internet connection, your application should not be totally dysfunctional. If there is something that can obviously be done offline, users will expect to be able to do so.
For example, photo sharing applications should allow users to organise and edit photos at any time. These jobs can be saved in a queue if the application is not connected, and these operations can be played back on the server when the device goes back online.
The Facebook mobile app allows users to draft posts and write comments while offline, which will be posted when the device goes online.
One last example is the Dropbox iOS application. An Internet connection is required to retrieve files that the user has stored in the online folder. However, it also allows users to flag selected files for the application to cache locally in the phone's internal memory, making them available at all times.
We shall now look at some technologies that will enable you to realise this for your application.
1. Service Workers
A service worker is a script that runs in the background and responds to events from your webpage, which includes network requests. This ability to intercept the request and respond to them, whether through the network or cache, helps to provide a consistent experience even when there is no connection.
Support for service workers are relatively new and are still in development, which may result in browser compatibility issues. Most features have been implemented in modern browsers. Check out https://jakearchibald.github.io/isserviceworkerready (opens in a new tab) for the current state of support.
Even if the targeted browser does not support service workers, your application should still degrade gracefully! Offline support is just a good-to-have; the core functionality of your site should still work!
To get started, we first need to register a service worker with our browser. Create two files:
- A service worker file named
service-worker.jsin your application root app.js/main.jsfile that will be included in your application, and add the following code to it:
<script>
  // Check if browser supports service workers
  if ('serviceWorker' in navigator) {
    // Registration of service worker
    navigator.serviceWorker
      .register('/service-worker.js')
      .then(function () {
        console.log('Registered Service Worker');
      })
      .catch(function () {
        console.log('Unable to register');
      });
  }
</script>
In this example, we first check to see if the browser supports service workers. If the browser does support it, we will then register our service worker script.
Caching required files
In order for your application to work offline, the service worker will need to have all the files related to your application. When your application page is visited for the first time, an install event will be fired. The service worker can then listen to this event and cache the required files through the Cache API (opens in a new tab).
Add the following code to service-worker.js to handle the install event:
self.addEventListener('install', function (event) {
  event.waitUntil(
    caches.open('cache_name').then(function (cache) {
      return cache.addAll([
        '/',
        '/style.css',
        // ...
      ]);
    }),
  );
});
The service worker first opens the cache with the cache_name, before calling addAll that takes in an array of URLs and retrieves all the response objects associated with the URLs. These response objects are then cached for future usage.
Serving the cached files
Now that the required files have been cached by the Service Worker, we can serve the page directly to the user without sending new network requests to retrieve these files. Similar to the install event when a page is first visited, a fetch event will be fired if the page is visited again. The service worker can then handle this event to return the cached response.
self.addEventListener('fetch', function (event) {
  event.respondWith(
    caches.match(event.request).then(function (response) {
      // Response for the request is found in cache, return the response
      if (response) {
        return response;
      }

      // Response is not found in cache, make a network request instead
      // You might need to polyfill `fetch` or replace with other forms of ajax calls
      return fetch(event.request);
    }),
  );
});
In this example, the event request is matched against the cache for a cached response. If a corresponding response is found, the cached response will be returned instantly. If not, the request will be passed on to the server to retrieve the response.
Cache Management
Next, we need to ensure that the service worker and cache are up to date. For the service worker, the browser will automatically update and install the new service worker script once changes are detected from the server. This will kick off a new sequence of install events, followed by an activate event when the new service worker takes over.
However, cache management, such as purging unused cached data, has to be managed by the service worker itself. This should be done in the activate callback to ensure that the latest script is used to manage the cache:
self.addEventListener('activate', function (event) {
  // Cache management. E.g. Purging unused data
});
Additional Resources
This is just a basic introduction to service workers, which can be utilised more efficiently to provide more comprehensive Progressive Web App experiences. For example, rather than caching everything during the install phase, we could also cache new requests progressively as the user explores the application. Service workers can also handle the push event, which can be used to create web notifications that will create a native-like experience. More info can be found here (opens in a new tab).
There are tons of resources available online for service workers. Here are a few resources to kickstart your learning process:
- https://developer.mozilla.org/en-US/docs/Web/API/Service_Worker_API/Using_Service_Workers (opens in a new tab)
- https://jakearchibald.github.io/isserviceworkerready/resources.html (opens in a new tab)
2. Web Storage
Service workers allow resources to be retained locally, but JavaScript variables do not survive past the lifetime of the application. When the application is restarted, it is reset to a clean state. Prior to HTML5, cookies have been used to retain client state; however, this method creates a burden on the network as all cookies associated with a domain are sent with every request. Web Storage is a storage API that allows the storing of data associated with a site, which persists across sessions without the drawbacks of using cookies.
Web Storage is a key/value store and can be accessed through the localStorage object or the sessionStorage object. On your own, find out the difference between sessionStorage and localStorage. We will cover localStorage in the next example.
<script>
  var user = localStorage.getItem('user');
  if (user) {
    console.log(JSON.parse(user));
    // localStorage.clear();
    // localStorage.removeItem('user');
  } else {
    var newUser = {id: '1234', name: 'Bob'};
    localStorage.setItem('user', JSON.stringify(newUser));
  }
</script>
In the example above, nothing is observed when the user first loads the page. However, we define a new user object containing the user's ID as well as his name and add it into the key/value store. When the page loads in future, we will see that the user has already been set and will show up in the console. We can also clear the localStorage object or remove a specific key/value pair. As Web Storage does not support storing objects, one workaround is to store the object in stringified-JSON format.
For a complete list of Web Storage's capability, visit https://html.spec.whatwg.org/multipage/webstorage.html (opens in a new tab).
3. Online/Offline Events
Storing data is easy; the tricky part comes when having to deal with synchronisation of states between the client and server.
How does the server update a client when it connects with outdated data? How will a client post outstanding jobs when it goes online? What happens if both cases occur at the same time with conflicting instructions (e.g. client tries to comment on a thread that has already been deleted from the server)? These are but a few out of many possibilities that have to be considered.
How you handle the problem depends on your application; prior to that, your application would actually need a means to determine if there is an Internet connection:
<script>
  if (navigator.onLine) {
    alert('Online');
  } else {
    alert('Offline');
  }

  window.addEventListener(
    'online',
    function (event) {
      alert('Online');
    },
    false,
  );

  window.addEventListener(
    'offline',
    function (event) {
      alert('Offline');
    },
    false,
  );
</script>
navigator.onLine is a boolean value containing the device's current Internet connection state. You can also register callbacks for the online and offline events. Try visiting the page on your mobile device and watch the events fire as you toggle your Wi-Fi on and off.
Word of caution - the behaviour of navigator.onLine is flaky on desktop browsers but works fine on mobile browsers (Chrome). It is not the most reliable method of testing network connectivity.
Milestone 10: Implement and briefly describe the offline functionality of your application. Explain why the offline functionality of your application fits users' expectations. Implement and explain how you will keep your client synchronised with the server if your application is being used offline. Elaborate on the cases you have taken into consideration and how they will be handled.
Communicating with the Server
Your application needs to be able to communicate the user's actions to the server. Since our application runs in the browser, we can use an AJAX call to do so. AJAX allows you to make HTTP requests using JavaScript without a page reload. The following example uses jQuery to make a request to the REST server we have created earlier:
<script>
  $.ajax({
    type: 'PUT',
    url: 'products/12345',
    contentType: 'application/json',
    data: {
      name: 'Apple',
      price: '0.5',
    },
    success: function (response) {
      // Succeeded! Do something...
      console.log(response);
    },
  });
</script>
Within the AJAX call, the type refers to the HTTP request method. Just by looking at the parameters, we should already know that PUT /products/12345 is a request to modify the information of the product with id = 12345. Therefore, it makes sense to send the new information to the server through the data parameter. If you are expecting JSON to be returned, set the dataType to json, and jQuery will decode it for you. Also, the contentType defaults to urlencoded – remember to specify this parameter if the server expects the data to be in some other encoding.
Finally, callbacks can be used to perform actions when the AJAX call succeeds or fails. Make sure that users are notified of a failure instead of being kept in suspense. Visit https://api.jquery.com/jQuery.ajax/ (opens in a new tab) for a full list of options that $.ajax() has to offer.
Authentication
Being able to communicate with a server is cool, but more work has to be done. With the right tools, anyone can send a request to your server, and you need to protect important API calls so that only the rightful users can make them (e.g. only the blog owner should be able to delete their own articles). To do so, we need some ways of determining the identity of the user making the request.
One simple approach is to make use of JSON Web Token (JWT (opens in a new tab)), which is a digitally signed JSON object for transmitting information between different parties. JWT consist of three parts:
- Header - Contain the token metadata, which usually consists of the type of token and the encryption algorithm.
- Payload - The second part of the token is the payload, which contains the claims. Claims are statements about an entity (typically, the user) and additional metadata.
- Signature - The headers and payload digitally signed with the encryption algorithm.
// Header
{
  "alg": "HS256",
  "typ": "JWT"
}

// Payload
{
  "sub": "1234567890",
  "name": "John Doe",
  "admin": true
}
Given this header and payload, the JWT string will then be created in the following manner:
<script>
  const encodedHeader = base64URLencode(header);
  const encodedPayload = base64URLencode(payload);
  const encodedSignature = base64URLencode(
    HMACSHA256(encodedHeader + '.' + encodedHeader, SECRET),
  );

  const encodedJWT =
    encodedHeader + '.' + encodedPayload + '.' + encodedSignature;
</script>
Hence a JWT consists of the encoded header, payload and signature, which is then appended together with periods as the delimiter.
When the user is first authenticated with your app using their credentials, the JWT will be returned to the user and stored locally. This token can then be added to the Authorization header in future API requests as part of the authentication.
Authorization: Bearer <eyJhbGciOiJIUzI1NiIsInR5cCI6IkpXVCJ9.eyJzdWIiOiIxMjM0NTY3ODkwIiwibmFtZSI6IkpvaG4gRG9lIiwiYWRtaW4iOnRydWV9.TJVA95OrM7E2cBab30RMHrHDcEfxjoYZgeFONFh7HgQ>The JWT may look cryptic, but it is, in fact, reversible. You should use SSL when using such a scheme. Once again, the choice of authentication protocols for RESTful APIs has always been a point of debate with no hard-and-fast rules. It is your job to identify the most practical choice for the requirements of your application. JSON Web Tokens should be sufficient in most cases, but feel free to use any methods you deem fit. More reading about JWTs can be found here: https://jwt.io (opens in a new tab).
Milestone 11: Compare the advantages and disadvantages of token-based authentication against session-based authentication. Justify why your choice of authentication scheme is the best for your application.
Native Look and Feel
Although your application may not be native, it may be a good idea to style it to look and feel like one. Owners of mobile devices have probably become accustomed to the user interface provided by the operating system, so they instinctively know how to use a native application when faced with one. When there seems to be more information, they try to scroll down. When they perform a swipe, they expect to see the next page. Likewise, to navigate through the application, looking for tabs at the bottom of the screen is the first thing that comes to mind. By making your application native-like, its learning curve becomes less steep. In addition, as a lot of research have been done by the mobile device creators to arrive at the current interface, we are less likely to make design mistakes by replicating it. Read about this research study (opens in a new tab) by Google and AnswerLab.
How can we emulate a native application? As part of the goal to improve the mobile web, HTML5 and CSS3 have been loaded with many new features. These features include animations, 3D transformations, visual effects and events which can reproduce the native look and feel when used in parallel. To do so, however, is time-consuming and is a sizable project on its own. Fortunately, others have done the dirty work, and there are many open-sourced frameworks and libraries you can use to easily recreate the native experience.
The following are some options you can consider:
- Ionic - http://ionicframework.com/ (opens in a new tab)
- Ratchet - http://goratchet.com/ (opens in a new tab)
- Framework7 - https://framework7.io/ (opens in a new tab)
- Onsen UI - https://onsen.io/ (opens in a new tab)
- Vuetify - https://vuetifyjs.com/en/ (opens in a new tab)
- Material-UI - http://www.material-ui.com/ (opens in a new tab)
The following are some options you should avoid. They look horrid:
- jQuery Mobile - http://jquerymobile.com/ (opens in a new tab)
- jQTouch - http://jqtouch.com/ (opens in a new tab)
You probably know this by now, but using others' code does not come without any cost. Some have very steep learning curves, others may require you to adopt a totally different style of programming, and certain ones may be hardly or badly documented. Worst of all, the code may be littered with bugs, and you certainly do not have the time to be fixing someone else's problems. Be sure to do a thorough evaluation before making a decision. Also, be warned that the teaching staff may be unfamiliar and thus unable to assist with problems encountered with external frameworks/libraries.
Milestone 12: Justify your choice of framework/library by comparing it against others. Explain why the one you have chosen best fulfills your needs. Lastly, list down some (at least 5) of the mobile site design principles and which pages/screens demonstrate them.
User Experience
Another important part of your application is the user experience. Please note that user experience (UX) is different from the user interface (UI). A pretty UI does not guarantee a good UX at all. Sometimes, a cool-looking UI can be a disaster because of poor UX. Sites like Reddit (opens in a new tab) and Craigslist (opens in a new tab) still have a ton of daily active users despite their UI. 😵
UX encompasses all aspects of the end-user's interaction with the application. There are many components that comprise a good UX, but minimally the application should allow the users to do what they want with minimal fuss. UX goes far beyond giving users what they say they want or providing a checklist of features. In order to achieve a high-quality user experience in your application, careful thought must be put into its functionality, interaction design and interface design.
UX is not just the job of the UI designer. Just like a good UI, you will know if an application's UX is good or bad. Any team member can contribute to your UX design by using it and providing feedback and suggestions. Ask your friends to use it as well to gather more feedback and ideas.
Milestone 13: Describe 3 common workflows within your application. Explain why those workflows were chosen over alternatives with regards to improving the user's overall experience with your application.
Google Analytics
You should be interested in the usage statistics of your application. Google Analytics is one popular way to collect insights. It can be set up easily — the following examples are using the analytics.js snippet, part of Universal Analytics. We will discuss Google Analytics in the following section, but feel free to use any alternatives that you may prefer. More recently, there has been increasing focus on more privacy-centric website analytics services.
If your application's interface is predominantly built with a JavaScript MVC framework, it is very likely that you have a Single-Page Application; one HTML page with all transitions handled by JavaScript code and URLs managed by HTML5 pushState API. Pages can still be tracked using Virtual Pageviews by executing the following code instead. Refer to https://developers.google.com/analytics/devguides/collection/analyticsjs/single-page-applications (opens in a new tab) for more information.
ga('set', 'pageview', '/your_virtual_page_path');Event Tracking can provide more fine-grained control over user actions. They can be used to track more events such as successful AJAX calls, buttons pressed, or even videos downloaded. The following code can be embedded in the click callback of a button that publishes a new blog post:
ga('send', 'event', 'button', 'click', 'publish');In particular, Social Interaction Analytics can be used to track clicks on social buttons on your application, such as Like, Share or Tweet buttons. To learn how to track social network activity, check out https://developers.google.com/analytics/devguides/collection/analyticsjs/social-interactions (opens in a new tab).
Google Analytics only updates the reports once a day, do not expect to see immediate results. There are, however, signs to check that your application is being tracked:
-
Check the Network tab in the developer tools provided by your browser. Every time a tracked page or event occurs, a new GA request should appear.
-
Use "Real-Time" mode in the Analytics dashboard, which allows you to view activities on your application in near real-time.
-
Use the official Google Analytics Debugger Chrome Extension (opens in a new tab) (recommended)
More information and examples at https://developers.google.com/analytics/devguides/collection/analyticsjs/ (opens in a new tab).
Milestone 14: Embed Google Analytics or equivalent alternatives in your application and give us a screenshot of the report. Make sure you embed the tracker at least 48 hours before the submission deadline as updates for Google Analytics are reported once per day.
Google Lighthouse
To guide you in building more performant and accessible progressive web apps, you can use Lighthouse to audit your app. This open-source auditing tool provides scores, individual metrics and feedback for four categories:
-
Progressive Web App - To what extent your application can be considered a progressive web application.
-
Performance - Audits to measure your application's overall performance.
-
Accessibility - Audits to improve the accessibility of your app. For example, ensuring all image elements should have an alt attribute.
-
Best Practices - Advisory audits that provide recommendations to modernise your app and counter performance pitfalls.
-
SEO - Audits to estimate how well your page is optimised for search engine results ranking.
Here are some links to get you started on using Lighthouse:
- https://developers.google.com/web/tools/lighthouse/ (opens in a new tab)
- https://www.keycdn.com/blog/google-lighthouse/ (opens in a new tab)
- https://youtu.be/NoRYn6gOtVo (opens in a new tab)
Milestone 15: Achieve a score of at least 8/9 for the Progressive Web App category on mobile (automated checks only) and include the Lighthouse HTML report in your repository.
Phase 4: Coolness Factor
It's very easy to be different, but very difficult to be better.
– Jonathan Ive
This section is purely optional. Completing milestone(s) described in this section may contribute to the 30% coolness factor.
Several suggestions have been provided. We emphasise that these are merely suggestions, which means that if you find them unsuitable for your application, you may still score full points in coolness by coming up with ideas of your own. On the other hand, blindly using these suggested technologies to create redundant features will not get you any credit. It is about using them in creative ways to make your application more desirable to use.
Social Integration (Optional)
Social platforms like Facebook, Instagram and Twitter receive billions of users every month, the majority of whom are on mobile devices. Where else can you find the potential to reach so many people without a single cent spent on advertising?
Integrating Facebook Login can help potential users overcome the inertia of a tedious sign-up process and can potentially make them more inclined to try your application.
Facebook Social Plugins (opens in a new tab) or Twitter for Websites (opens in a new tab) creates a wall post or tweet with a single click of the mouse, extending your reach to friends and followers of your current users. Having just one friend per user (out of hundreds) sign up would easily double your user base.
Best of all, most of these features can be included by copying and pasting provided code snippets or calling a few functions in the JavaScript SDK. This is so simple that it is a waste not to do so. Without much additional effort, you can get your application seen and possibly used by many more people. Of course, your application must be good or no one would share it.
Milestone 16: Identify and integrate with social network(s) containing users in your target audience. State the social plugins you have used. Explain your choice of social network(s) and plugins. (Optional)
Geolocation (Optional)
Geolocation services are becoming increasingly popular with people. Many services have made their applications location-aware to provide users with more relevant results.
Fortunately, Geolocation is specified in HTML5, so non-native applications can also make use of this powerful feature. The Geolocation API consists of three simple functions you can use to make your application location-aware. When calling these functions, callbacks are passed to handle success and failure cases.
-
getCurrentPosition: Invokes a callback with the user's current position passed as the first parameter. -
watchPosition: Does the same asgetCurrentPosition. In addition, it starts monitoring the user's position and invokes the provided callback whenever it changes. The new position is passed to the callback as the first parameter. -
clearWatch: Stop monitoring user's position.
This code will continue to output the user's position as they walk about with their mobile device:
<script>
  if (navigator.geolocation) {
    // check if browser supports geolocation
    navigator.geolocation.watchPosition(
      function (position) {
        // success
        var lat = position.coords.latitude;
        var lng = position.coords.longitude;
        console.log('Pos: [', lat, ',', lng, ']');
      },
      function (error) {
        switch (error.code) {
          case error.PERMISSION_DENIED:
            console.log('Permission denied');
            break;
          case error.POSITION_UNAVAILABLE:
            console.log('Position unavailable');
            break;
          case error.TIMEOUT:
            console.log('Timeout');
            break;
        }
      },
    );
  }
</script>
Showing the user their coordinates may hardly be of any use to them at all. You could take it up one level by plotting it on a map and perhaps places of interest near them.
For complete documentation of Geolocation API and Google Maps, visit https://w3c.github.io/geolocation-api/ (opens in a new tab) and https://developers.google.com/maps/documentation/javascript/reference (opens in a new tab) respectively. Mapbox (opens in a new tab) is a nice alternative to plotting maps and allow more customisation of the map for more UI goodness.
Milestone 17: Make use of the Geolocation API in your application. (Optional)
Other Emerging Features and Useful Resources
There are a lot more cool and useful web APIs than what has been described in this document. For example, notification APIs (opens in a new tab) let you send out notifications at the system level; device APIs allow you to interact with users' hardware directly, including detect changes in ambient light (opens in a new tab), check battery status (opens in a new tab) or trigger vibration (opens in a new tab); imagine playing a web-based game, and when you set off some explosives, your phone vibrates!
Here are some useful links:
- https://developer.mozilla.org/en-US/docs/Web/Reference/API (opens in a new tab)
- https://developer.chrome.com/extensions/api_other (opens in a new tab)
- http://caniuse.com (opens in a new tab)
You can also check out this video by Google (opens in a new tab) that recaps some of the things we covered above.
Assessment Scheme
The grading of the assignment is divided into two components: satisfying the compulsory milestones (70%) and the coolness factor (30%). Excluding Milestone 0, there are 17 milestones in total: two are optional (Milestones 16 and 17). That leaves you with 15 compulsory milestones. Milestone 4 is worth 3%, and Milestone 9 is worth 2%. The rest are worth 5% each.
The bonus milestones and the optional milestones will contribute towards the remaining 30%.
Overall, the mobile cloud application assignment is worth 20% of your final grade.
Mode of Submission
The following will need to be both submitted to Coursemology (under "Assignment 3 - Mobile Cloud Application") and included in your GitHub repository:
-
A write-up,
group-<number>-milestones.pdf, containing your answers to all compulsory milestones that require written answers. Categorise your answers by the milestones they belong to. Please make sure that the URL for your application is clearly stated in the write-up for the convenience of the teaching staff. -
A one/two-page pitch of your application,
group-<number>-pitch.pdf, pitching your application to the teaching staff, i.e. convince us that your application is so good that it deserves all 30% of the coolness points. Restrictions: no longer than 2 A4 sides.
The following will only need to be included in your GitHub repository:
-
A
README.mdfile in the root directory. GitHub will automatically render it on your repository's front page. You may wish to style it using any of the supported markup languages. The file should contain:- The list of group members, including matriculation numbers, names and a description of the contributions of each member to the assignment.
- The URL to your application, i.e. your application must be accessible online somewhere.
- The name of your application.
- Set-up instructions for local testing (good to have).
-
The code for your application. If your group is using Git submodules, make sure these submodules are also accessible by the teaching team (and that they are updated to reference the latest commits).
-
Lighthouse HTML report,
group-<number>-lighthouse.html.
Not following the submission instructions (e.g. incorrect file naming) will result in the deduction of marks.
Clarifications and questions related to this assignment should be posted to the Coursemology Forum.
Good luck and have fun!